What is the purpose of std::enabled_shared_from_this<T>?

Last year, as I was messing around with async networking using Boost.Asio, I faced this class from the header <memory>. And I asked the most beloved question of a C++ developer: “WTF is this?!?”.
Today I again started working on a project that uses asio and decided on explaining what is going on since I have a blog now.

The famous std::shared_ptr

In order to understand std::enable_shared_from_this, one must understand how a shared pointer works.
And if you think you know how a shared pointer works but don’t know what std::enable_shared_from_this does, you should definitely not skip this section.

A std::shared_ptr<T> is a smart pointer that counts the reference of a wrapped raw pointer and frees the memory whenever that memory count reaches 0.
It is especially useful for scenarios where you need to share some resource among different objects. A shared pointer wraps the two following pointers:

(1) Member variables of the shared_ptr_base class

I won’t go into the details but these pointers are basically our raw pointer and a pointer to the control block (even though they commented only as “Reference counter”, it does much more than that). The control block also contains the reference counter of our std::shared_ptr<T>. Below is another diagram to understand how it looks like because this structure is very important to not mess the things up when working with shared pointers.

(2) Structure of a shared_ptr

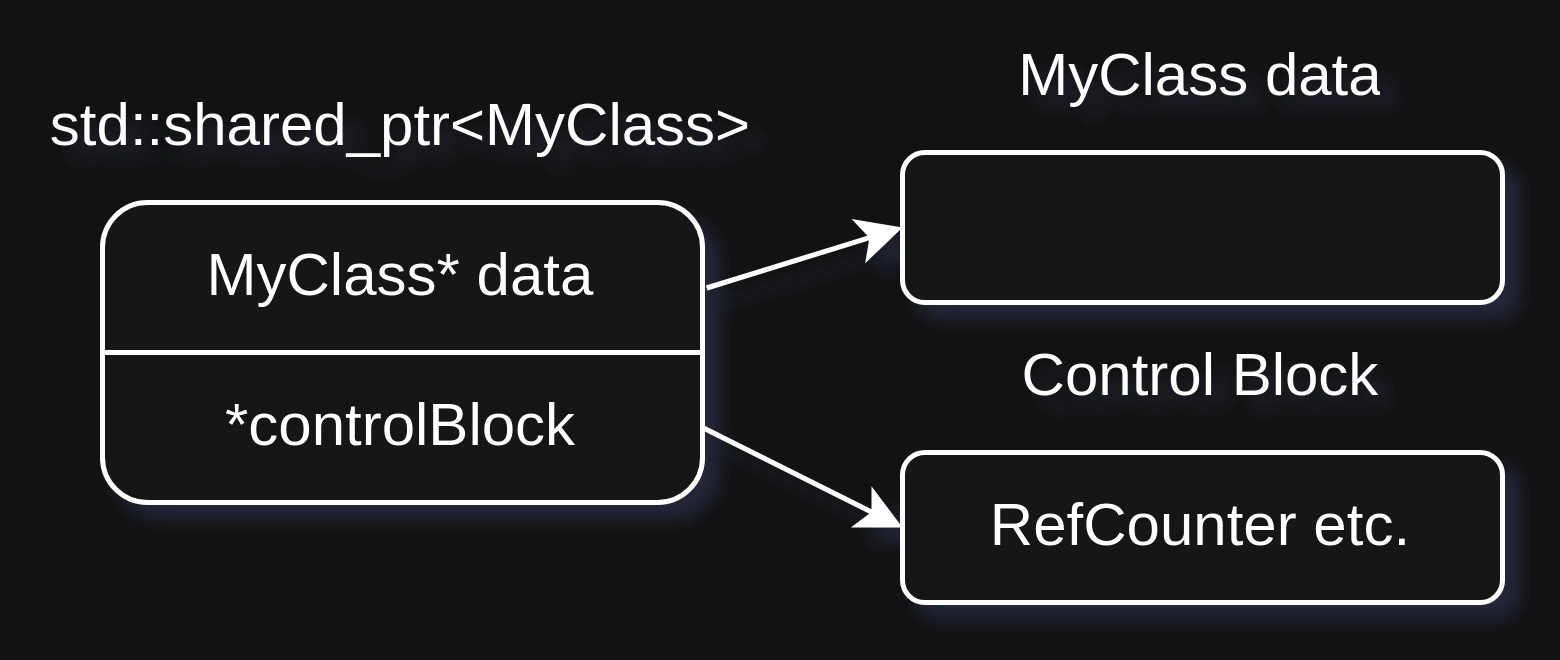
Grasping this concept is very important because as the diagram suggests, the raw pointer and the control block do not know each other. This is the source of many possible pitfalls, which I will cover in the next section.

What could go wrong?

Let’s dive into a basic usage of shared pointer to understand what might go wrong:

1
2
3
auto data = new MyClass;

std::shared_ptr<MyClass> s_ptr1 = std::shared_ptr<MyClass>(data);

This is a basic case to create a raw pointer and pass the ownership of this data to the shared pointer.
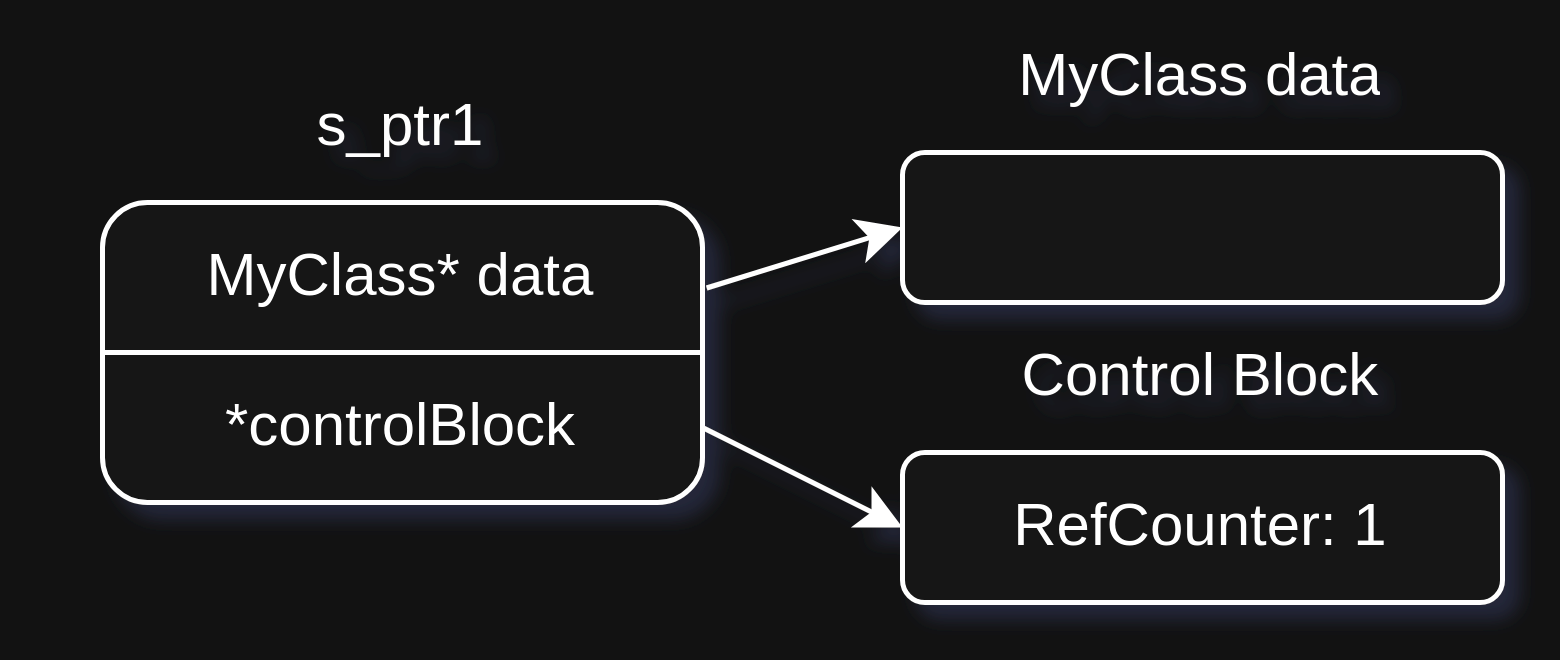
From now on, the shared pointer will care about the deallocation of the data. At this stage the memory of this shared pointer looks like:

(3) State of the s_ptr1

Now let’s make things more exciting and create another shared pointer that shares the ownership.
For this purpose I will show two different cases. First we will cover the good case and second the bad case. Consider the following first case:

1
2
3
4
auto data = new MyClass;

std::shared_ptr<MyClass> s_ptr1 = std::shared_ptr<MyClass>(data);
std::shared_ptr<MyClass> s_ptr2 = s_ptr1;

In this case we do the exact same thing in the last step but eventually we create another shared pointer by using the copy constructor of the std::shared_ptr<T>.
Now it results in a new std::shared_ptr<MyClass> object which shares the ownership by pointing to the same object and to the control block.
The current state now looks like:

(4) State of the s_ptr1 and s_ptr2. RefCounter is now 2

As a result, the reference count is equal to 2. This way we can make sure that our data is available for s_ptr1 even if s_ptr2 goes out of the scope and vice versa.

Now let’s consider another possible implementation, where things might not work as expected:

1
2
3
4
auto data = new MyClass;

std::shared_ptr<MyClass> s_ptr1 = std::shared_ptr<MyClass>(data);
std::shared_ptr<MyClass> s_ptr2 = std::shared_ptr<MyClass>(data);

In this code instead of using the copy constructor of the std::shared_ptr<T>, we simply pass the raw pointer to the constructor.
In the last section I mentioned an important take. The data and the control block have no idea about our shared pointer.
Therefore if we just take the raw pointer and construct another shared pointer it results in:

(5) State of the s_ptr1 and s_ptr2. RefCounter is separate for each shared pointer

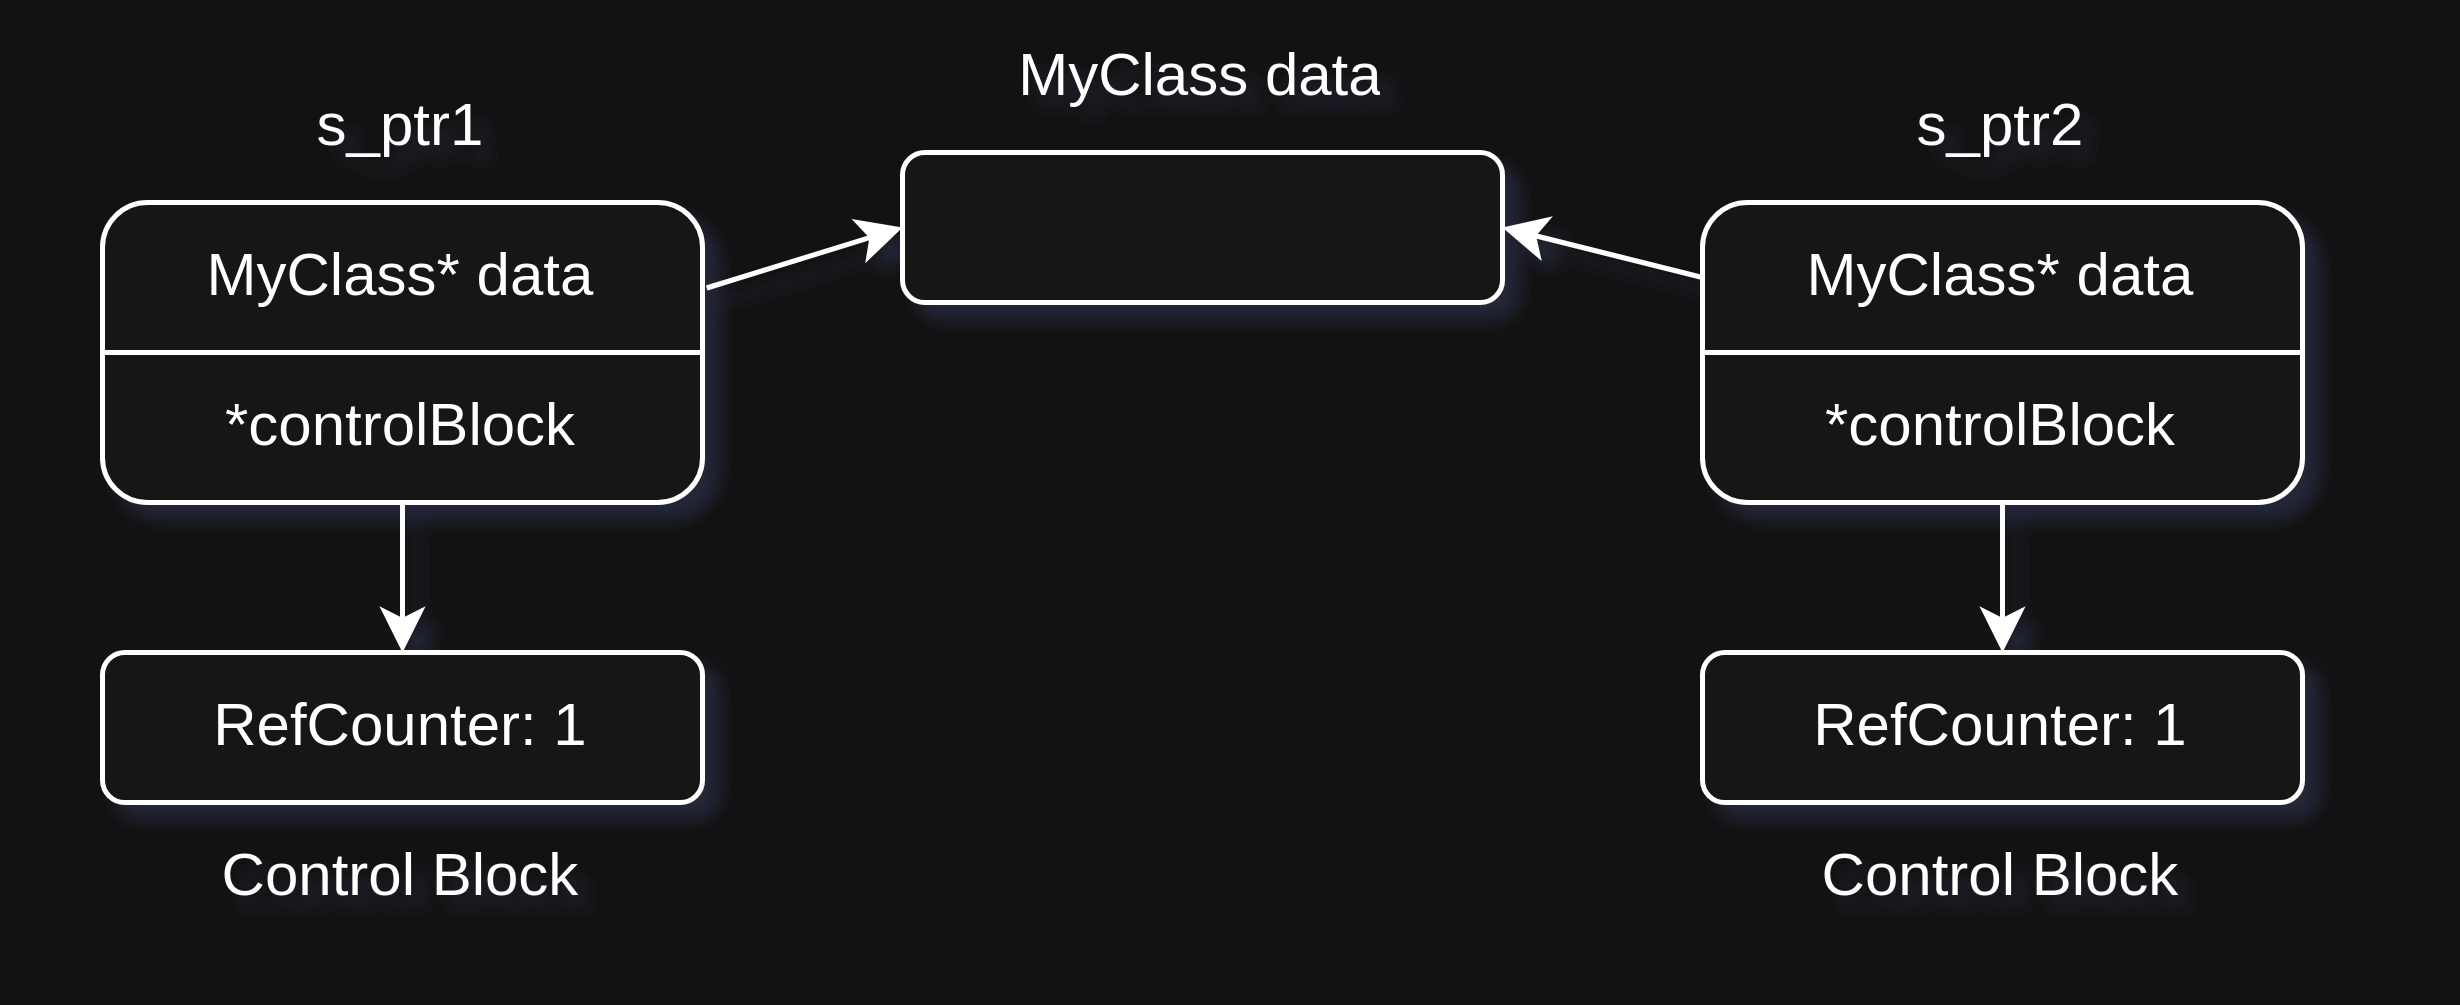
As we see in the diagram (5), now each shared pointer has its own reference counter while pointing to the same data.
That results in an ambiguity and a possible time bomb.
Whoever first goes out of scope will release the data and leave the other one to point to an invalid memory address.
Now if you are using address sanitizer and such a case happens in your tests, you are lucky. If not without specific knowledge it is painful to address the issue.

The magic of std::enable_shared_from_this<T>

Now lets get back to the main topic. Assume that you want to generate a new shared pointer within the class itself.
A reason for that might be generating a new shared pointer and passing it as a message to some other component or saving the object as a shared pointer into a container.
Here is a very basic example code which can lead to the pitfall mentioned above:

1
2
3
4
5
6
7
8
9
10
11
12
13
14
class MyClass {
public:
std::shared_ptr<MyClass> getSharedPtr() {
return std::shared_ptr<MyClass>(this); // Creates a new control block
}
};

int main() {
std::shared_ptr<MyClass> s_ptr1 = std::make_shared<MyClass>();

std::shared_ptr<MyClass> s_ptr2 = s_ptr1->getSharedPtr();

// ----> Destructor called twice!
}

We are trying to create a new shared pointer from the current object. The approach is naive but wrong.
The simple reason is that we are creating a new shared pointer by passing the raw pointer to the shared pointer constructor.
However, this leads to an undefined behaviour.

In order to solve that issue and generate a std::shared_ptr<MyClass> that shares the same reference counter as the initial object, we use the std::enable_shared_from_this<T>.
The correct implementation looks like:

1
2
3
4
5
6
7
8
9
10
11
12
13
14
class MyClass : public std::enable_shared_from_this<MyClass> {
public:
std::shared_ptr<MyClass> getSharedPtr() {
return shared_from_this(); // Uses the same control block as the current object
}
};

int main() {
std::shared_ptr<MyClass> s_ptr1 = std::make_shared<MyClass>(); // --> RefCount == 1

std::shared_ptr<MyClass> s_ptr2 = s_ptr1->getSharedPtr(); // --> RefCount == 2 as intended

// ---> Destructor called only once since both of the objects go out of scope
}

In this case we inherit our class from std::enable_shared_from_this<T> and use the function shared_from_this to create a new shared pointer that points to the same control block as the current object.

You might think that this would not be hard to catch since the examples are straightforward. However, I tried to keep the examples as simple as possible.
In larger projects and codebases that kind of errors might take days or weeks to catch.
Therefore I think it is always important to understand how the most basic things work in order to fix the most complex problems. Happy Coding!

The correct way to use GMock with Catch2

Hello World! In the last post I talked about the possible pitfalls of combining Catch2 with GMock. In this post I will go through the solution to this problem.

Possible solutions

If you stumbled upon this problem, you most probably made some research already. The useful result of this research for me was some Stackoverflow entries, an important inspiring repository and the Google Mock docs.

The Google Mock documentation already mentions the issue and provides two solutions. The first, less elegant solution is to configure Google Mock to throw exceptions on failures. For me there are two problems here. The first one is already mentioned: throwing exceptions from the mock object’s destructor. The second problem (and question) is: what happens if I have multiple tests that fail in one section? Overall I directly passed that solution because the second one is way more beautiful.

The second solution suggests to use the Google Test’s event listener API. As I was trying to implement the whole thing and digging into the source code of Catch2 and GMock, I realized this repository already provides an implementation. So. my rule of thumb is to skip reinventing the wheel. Instead, honor the original creator and seek ways to make their ideas even better.

Overriding the GTest’s EventListener class

The idea is very simple. GTest follows the well known Observer Pattern and it maintains a singleton instance called listeners. This is a container to hold all listeners that are interested in a possible notification (error, warning etc.). When a notification arises, such as a failed test case, every listener is notified. In the next section I will deep-dive how this is achieved, but first a listener must be implemented, which connects the GMock/GTest and the Catch2. The goal of this listener is to create a Catch2 notification from the GMock notifications and pass it to Catch2. According to the documentation we must inherit a Listener from the EmptyEventListener class of GTest. EmptyEventListener is a great class, which provides virtual empty implementations for all EventListener methods, instead of leaving us with a dozen of pure virtual functions that are excited to be implemented. Therefore, we only need to implement the functions we need, which is in our case only OnTestPartResult.As a starting point, here is the implementation of the custom listener from the owner of the mentioned repository:

1
2
3
4
5
6
7
8
9
10
11
12
13
14
15
16
17
18
19
20
21
22
23
24
25
26
27
28
29
30
31
32
33
34
35
36
class Listener : public testing::EmptyTestEventListener {
void OnTestPartResult(const testing::TestPartResult& result) override {
std::string filename = "unknown";
size_t linenumber = 0;
std::string message = "unknown";

if (result.file_name() != nullptr)
filename = result.file_name();

if (result.line_number() != -1)
linenumber = static_cast<std::size_t>(result.line_number());

if (result.message() != nullptr)
message = result.message();

::Catch::SourceLineInfo sourceLineInfo(filename.c_str(), linenumber);

if (result.fatally_failed()) {
::Catch::AssertionHandler assertion("GTEST", sourceLineInfo, "",
::Catch::ResultDisposition::Normal);

assertion.handleMessage(::Catch::ResultWas::ExplicitFailure, message);

assertion.complete();
} else if (result.nonfatally_failed()) {
::Catch::AssertionHandler assertion(
"GTEST", sourceLineInfo, "",
::Catch::ResultDisposition::ContinueOnFailure);

assertion.handleMessage(::Catch::ResultWas::ExplicitFailure, message);

assertion.complete();
}
}
};

It has some problems which we will be fixing but it is a great starting point. The code is very understandable: GTest notifies us with a TestPartResult& result which contains information like file name, line number and the message. Depending on the error type we create either a Normal assertion or a ContinueOnFailure assertion and process it in a Catch2-way. But what are the problems in that code? There are two problems, one of them is obvious and the second one is a very sneaky one (Hint: const char*).

  1. The code only works for Catch2 v2. It required some adaptations for different versions. For example assertion.setCompleted() is from major version 2, which is changed to assertion.completed() in the version 3. Or another issue is that assertion.handleMessage is expecting the message as an r-value reference starting from the version v3.7.1 with the related commit. This code must be tested and adapted for each Catch2 version.
  2. This is actually a very hard to see issue. The problem is at the constructor of the AssertionHandler. We create a local variable filename and pass the const char* of that variable to the constructor. However we don’t have any information what assertion is doing with our pointer. Eventually the usage might outlive the filename. The solution for this is to create a member-container that holds the filename for each notification. This way we can assure that the string is always there, since the listener is destroyed at the end of the program.

After solving these issues our code looks like the following:

1
2
3
4
5
6
7
8
9
10
11
12
13
14
15
16
17
18
19
20
21
22
23
24
25
26
27
28
29
30
31
32
33
34
35
36
37
38
39
40
41
42
43
44
45
class Listener : public testing::EmptyTestEventListener {

std::set<std::string> m_file_names; // Solution to 2.

void OnTestPartResult(const testing::TestPartResult& result) override
{
std::string filename = "unknown";
size_t linenumber = 0;
std::string message = "unknown";

if (result.file_name())
filename = result.file_name();

if (result.line_number() != -1)
linenumber = static_cast<std::size_t>(result.line_number());

if (result.message())
message = result.message();

auto [it, _] = m_file_names.insert(filename); // Solution to 2.
::Catch::SourceLineInfo sourceLineInfo(it->c_str(), linenumber); // Solution to 2.

if (result.fatally_failed()) {
::Catch::AssertionHandler assertion(
"GMock", sourceLineInfo, "", ::Catch::ResultDisposition::Normal);

assertion.handleMessage(::Catch::ResultWas::ExplicitFailure,
std::move(message)); // Solution to 1.

assertion.complete(); // Solution to 1.
} else if (result.nonfatally_failed()) {
::Catch::AssertionHandler assertion(
"GMock",
sourceLineInfo,
"",
::Catch::ResultDisposition::ContinueOnFailure);

assertion.handleMessage(::Catch::ResultWas::ExplicitFailure,
std::move(message)); // Solution to 1.

assertion.complete(); // Solution to 1.
}
}
};

The changes we apply include adding the m_file_names variable, the version specific assertion.complete and the changed signature of the assertion.handleMessage function. Be aware that this signature is only valid starting from v3.7.1.

Adding the custom Listener to the GTest’s listeners

In the last section we created our own GTest listener, which will notify the Catch2 about the failing GMock checks. But we also need to make sure that GTest knows that we want him to notify our listener instead of some other listener object. For this purpose we will replace the default GTest listener with our listener. Here is a main that would solve this problem according to the event listener API :

1
2
3
4
5
6
7
8
9
10
11
12
int main(int argc, char** argv)
{
Catch::Session session;
InitGoogleMock(&argc, argv);

TestEventListeners& gtest_listeners = UnitTest::GetInstance()->listeners();
gtest_listeners.Append(new GTestCatch2Listener());
delete gtest_listeners.Release(
UnitTest::GetInstance()->listeners().default_result_printer());

return session.run(argc, argv);
}

This code achieves a very simple task. It deletes the default listener from GTest, attaches our custom listener and passes the command line arguments to GMock and Catch2. With this main and the listener it is now safe to combine GMock and Catch2. We can verify this with a new test:
(1) Failures being detected

Summary

If you have made so far, thank you for reading. In this post I introduced a way to connect GMock and Catch2. However it is still not the best solution. In the next post I will be creating a library which acts as Catch2WithMain which provides a pre-compiled main and works correctly with GMock. This way we will be able to use GMock and Catch2 only by linking against this new library. The code for this post can be found here Cheers.

The danger of combining GMock with Catch2

Recently I stumbled upon a problem while writing unit tests. The unit tests I wrote were not failing even though they were supposed to fail. At first, I thought I had made a mistake in my mock classes, but the issue turned out to be completely different.

Catch2 is a great BDD (Behavior Driving Development) framework for C++, however it lacks a main functionality; Mocking. Therefore it would be useful to deploy GMock at this point. However this comes with a great danger. In this post I want to write about the danger and possible pitfall of combining GMock with Catch2 or possibly any other unit testing framework.

One might think: why not GoogleTest? The question is understandable but GTest does not offer BDD. It is designed to write TDD tests. Therefore it is a combination, which makes completely sense.

I will share the complete code in my repository.

Writing a very basic mock

Let’s start with a very basic class and the mock for this class:

1
2
3
4
5
6
7
8
9
10
class ClassToTest{
public:
virtual void some_call(){};
};


class MockClass : public ClassToTest{
public:
MOCK_METHOD(void, some_call, (), (override));
};

This should be pretty straightforward. We have a class we want to test, ClassToTest, and the corresponding mock class, MockClass. Now, let’s add a caller for that class:

1
2
3
4
5
6
7
8
class SimpleWrapper{
public:
SimpleWrapper() = delete;
SimpleWrapper(ClassToTest& sc) : m_obj { sc }{};
void call(){m_obj.some_call();};
private:
ClassToTest& m_obj;
};

The SimpleWrapper takes an ClassToTest as reference and allows us to call its some_call method. Now we are ready to test our class.

Writing and running some tests in Catch2

In this phase we can write some tests to check our class with Catch2. Here are some very minimal tests:

1
2
3
4
5
6
7
8
9
10
11
12
13
14
15
16
17
using namespace ::testing;
TEST_CASE("Strict Mock Test")
{
auto mock = StrictMock<MockClass>();
auto caller = SimpleWrapper(mock);

caller.call();
}

TEST_CASE("Expect call")
{
auto mock = NiceMock<MockClass>();
auto caller = SimpleWrapper(mock);

EXPECT_CALL(mock, some_call()).Times(100);
caller.call();
}

In the first test case we define a StrictMock and don’t set any expectations. However we call our function through our SimpleWrapper. The strict mock should report us the unexpected e.g. uninteresting call as an error. Therefore this is obviously a failed test case.

In the second test case, we define a NiceMock, which doesn`t affect our test case in terms of unexpected calls. The goal here is to set an expectation on some_call. We expect that our function gets called 100 times within this scope. However, we call it only once. This is, again, an obvious failed test case.

Running the test

Lets run our tests, which should obviously fail:

(1) First Test Results of CTest

This result is interesting and not what we would expect or want. Let’s simply run and see the output of our executable:

(1) First Test Results of Executable

The result is still the same however we can see that something is odd. Here’s what happens: we are using the precompiled main() of Catch2, which simply looks something like:

1
2
3
4
// Simplified from catch2/src/catch2/internal/catch_main.cpp
int main (int argc, char * argv[]) {
return Catch::Session().run( argc, argv );
}

That means we are getting the result of our tests from Catch2::Session. However the question is: does Catch2 recognize that GMock/GTest expressions are failing? The answer is NO!. The tests that are being conducted by Googletest must be passed to the Catch2. And Googletest developers have addressed this issue:

Using Google Mock with Any Testing Framework

TLDR: If you want to use GMock with other testing frameworks, it must be fine-tuned.

This issue is pretty obvious and straightforward after reading about it or figuring it out. However, it’s a really painful problem that will most likely cause someone to spend days trying to understand what’s happening without knowing the root cause.

Summary

Catch2 and GMock together form a very strong testing combination. However they do not work together out of the box. This might trick you into pushing a buggy code into the production.

Thank you for reading. The source code for this post can be found here In the next post, I will go into detail on how to solve this issue.